SuperCollider is probably my favorite creative coding tool. Not because it's the easiest, but because it's one of the most quirky and interesting pieces of software I've ever used.
For a while I've been fascinated by the idea of generatively designing sounds in code. Instead of manually tweaking knobs until something sounds good, what if we could describe the recipe for a sound and let a program explore thousands of variations for us?
After studying James McCartney's famous FM Tones Factory example included with SuperCollider, I finally started understanding how powerful SuperCollider can be as a free generative sound design environment.
In this article we'll use a kick drum as our example. Kicks are relatively simple to synthesize, which makes them perfect for learning the workflow. The same ideas can later be applied to snares, basses, FM sounds, percussion, drones, and more— provided you have a reasonable understanding of the recipe behind the sound you're trying to create.
Before we can generate variations, we need a kick drum that sounds good.
At its core, a synthesized kick drum is just a sine oscillator subjected to a rapid downward pitch sweep. The frequency starts high and quickly drops to a lower frequency, creating the familiar "thump" we associate with kick drums.
Many producers add extra ingredients:
We'll keep things simple and focus on the pitch-swept sine wave.
One useful trick is using Env.plot to visualize what
the frequency envelope is doing before we actually use it.
~kickenv = Env([480,10],[0.2]);
~kickenv.plot;
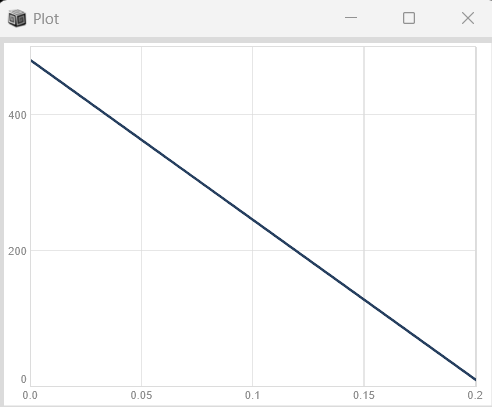
This gives us a linear sweep, but kick drums usually require something faster and more natural sounding.
~kickenv = Env([480,10],[0.2],curve:'exp');
~kickenv.plot;
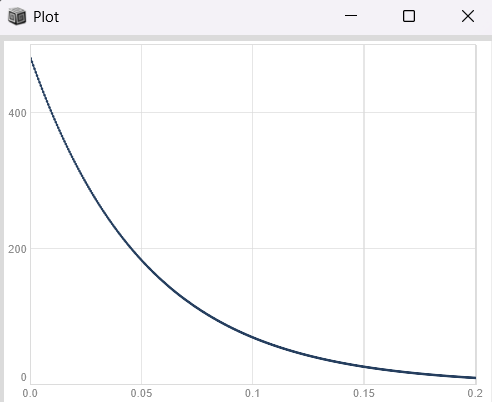
Or even better:
~kickenv = Env([480,10],[0.2],curve:-8);
~kickenv.plot;
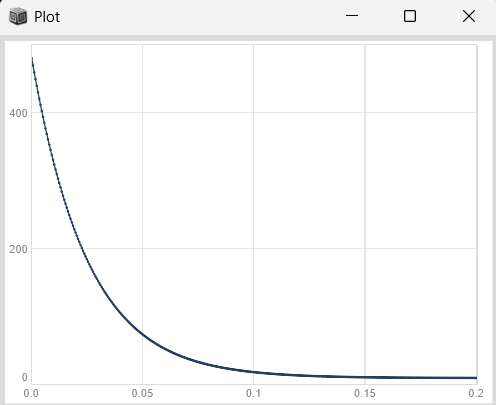
The negative curve gives us much finer control over the shape of the sweep.
(
SynthDef("kick",{
    |sweepd =480,sweept=0.2,sat=2,
     filtfreq =120,filtres=1.0,
     dist =200,rel =0.5, amp=0.5| //This sets our synth arguments for later modulation.

/*
Our chosen Parameters:

Sweepd = Sweep depth: How much we want to sweep through the pitch
Sweept = Sweep Time : How fast we want to sweep through the pitch
sat = Saturation: How much we want to fill the saturation bus.
Saturation basically uses distortion (in this case basic wavefolding) to "BOOST" the kick

filtfreq = Filter Frequency: We need to use a filter to pump up the fundamental tones of the kick drum.
filtres = Filter Resonance:  We are using a Band Pass filter and we need to set the resonance to accomplish above.

dist = distortion: Using wavefolders at a pre-filter stage can make your kick dirtier/grimey.
rel = Release: Can be used to sound out the kick in case we want something heavy/echoey.
amp = Amplitude: Loudness adjuster
*/

    var sig,env,freq ; //our synth variables

    freq = EnvGen.ar(
        Env([sweepd, 10], [sweept], -8) // Sweeping our pitch freqeuncy
    );

    env = Env.perc(0.0001,rel).ar(doneAction:2); //Tight envelope for percussion

    sig = SinOsc.ar(freq) * env; //Making our sine oscillator

    sig = (sig * dist); //tanh = Distortion early in the signal chain

    sig = BLowShelf.ar(
        sig,
        filtfreq,
        filtres
    ); //Band pass filter

    sig = tanh(sig * sat); //tanh = Bus saturator at the end of the signal chain

    sig = sig * amp; //Modulate amp

    Out.ar(0,sig!2); //Send the signal out to the left and right speaker.

    // sig!2 equals an array of [sig, sig] which means we are sending it to the list index of speakers
    //Refer to "multichannel expansion" in the Docs.

}).store; //Store allows our synth to persist even if we shut down the program,
//Meaning I don't have to re-execute this next time.
)
The important thing here is that every major characteristic of the kick
has been exposed as a parameter.
This makes the synth mutable and therefore suitable for exploration.
Note: Always write Args before declaring variables!
We can also rewrite it using namedcontrols instead of Synth Args
(
SynthDef("kick",{

    var sig,env,freq;

    freq = EnvGen.ar(
        Env([\sweepd.kr(480), 10], [\sweept.kr(0.2)], -8)
    );

    env = Env.perc(0.0001,\rel.kr(0.5)).ar(doneAction:2);

    sig = SinOsc.ar(freq) * env;

    sig = (sig * \dist.kr(200));

    sig = BLowShelf.ar(
        sig,
        \filtfreq.kr(120),
        \filtres.kr(1.0)
    );

    sig = tanh(sig * \sat.kr(2);

    sig = sig * \amp.kr(0.5);

    Out.ar(0,sig!2);


}).store;
)
Now we manually move around the parameter space and listen for what works.
Synth(
    "kick",
    [
        \sweepd,120,
        \sweept,0.15,
        \sat,8,
        \filtfreq,620,
        \filtres,5.6,
        \dist,1,
        \rel,0.15,
        \amp,0.8
    ]
);
The goal isn't perfection. The goal is discovering the useful boundaries of the sound.
After enough experimentation I arrived at rough ranges:
sweepd:   150 - 450
sweept:   0.1 - 0.3
sat:      2 - 8
filtfreq: 200 - 500
filtres:  0.1 - 1.0
dist:     2 - 8
rel:      0.2 - 1.0
Think of this as defining the search space for future kick drums.
Now comes the fun part.
Instead of designing one kick drum, we generate dozens automatically.
(
n = 60;

~kick = IdentityDictionary.new; //Creating a dictionary for param lookups

n.do { |i|

    ~kick[i] = (

        sweepd: exprand(100,450),
        sweept: exprand(0.1,0.3),
        sat: exprand(2,8),
        filtfreq: exprand(20,500),
        filtres: exprand(0.1,1.0),
        dist: exprand(1,8),
        rel: exprand(0.15,0.9)

    );

};

)
Notice the use of exprand().
For sound design, exponential distributions are often much more useful
than linear randomization because our perception of frequency, time,
and loudness tends to be logarithmic.
Synth(\kick, ~kick[18].asKeyValuePairs);
You can also override parameters:
Synth(
    \kick,
    ~kick[12].asKeyValuePairs
    ++ [
        \sat,20,
        \rel,0.2
    ]
);
The easiest way to explore your generated sounds is by automatically cycling through them.
(
Tdef(\cyclethroughkicks, {

    n.do { |i|

        Synth(
            \kick,
            ~kick[i].asKeyValuePairs
        );

        0.51.wait;
    };

}).play;
)
When you hear something interesting, pause the routine and inspect
the parameters.
This makes sound design a quest in morphospace.
Randomness is powerful, but completely unconstrained randomness often produces unusable results.
A better strategy is dividing the search space into regions.
Each category gets its own parameter ranges.
Its great for creating like sections in timbral quality.
For example, like delineating TR-606's, 707's, 808's, 909's etc.
Back to home.
Email: mxchina@disroot.org
Copyright 2000–2027, G Panicker. All rights reserved.